2014년 4월 3일 목요일

Cocos2d-x 함수 사용

Sprite 생성 

CCTexture2D* texture;
texture = CCTextureCache::sharedTextureCache()->addImage("Images/white-512x512.png");
CCSprite* bricks = CCSprite::createWithTexture(texture, CCRectMake(0, 0, 64, 40)); 

2초후에 동작시키기 

CCFiniteTimeAction* action = CCSequence::create(
CCDelayTime::create(2),
CCCallFunc::create(this, callfunc_selector(TestScene3::startGame)),
NULL);
this->runAction(action); 

Touch 동작시키기

virtual void ccTouchesBegan(CCSet *pTouches, CCEvent* event);
virtual void ccTouchesMoved(CCSet *pTouches, CCEvent* event);
virtual void ccTouchesEnded(CCSet *pTouches, CCEvent* event);
virtual void ccTouchesCancelled(CCSet *pTouches, CCEvent* event);

this->setTouchEnabled(true); // 터치 활성화
void TestScene3::ccTouchesBegan(CCSet *pTouches, CCEvent* event){
CCSetIterator it = pTouches->begin();
CCTouch* touch = (CCTouch*)(*it);
CCPoint touchPoint = touch->getLocation();

CCRect rect = paddle->boundingBox();
if (rect.containsPoint(touchPoint)) { // 점을 포함하고 있는지 체크한다.
}

스캐쥴 사용

this->schedule(schedule_selector(TestScene3::gameLogic), 2.0f/60.0f); // 2/60 Interval로 gameLogic을 실행한다. 

 메뉴 처리

CCMenuItemImage *pMenuItem1 = CCMenuItemImage::create( "Images/btn-play-normal.png",
Images/btn-play-selected.png,
this,
menu_selector(HelloWorld::doClick1));
pMenuItem1->setTag(1);
CCMenu* pMenu = CCMenu::create(pMenuItem1, pMenuItem2, pMenuItem3, pMenuItem4, pMenuItem5, NULL);
pMenu->alignItemsVertically();
this->addChild(pMenu);

void HelloWorld::doClick1(CCObject *p){
CCMenuItem *tItem = (CCMenuItem*) p;
switch ( tItem->getTag () ){
if ( (CCSprite*)getChildByTag(1) == NULL ) {
}
}

문자열 출력하기 

CCLabelTTF *label = CCLabelTTF::create("callback 1 called", "Marker Felt", 16);
label->setPosition(ccp(120,160));
label->setColor(ccBLACK);
label->setTag(100);
addChild(label); 

문자열 Atlas 출력하기 

CCLabelAtlas *pLabel3 = CCLabelAtlas::create("1234", "fps_images.png",  16, 24, '.');
pLabel3->setPosition(ccp(size.width / 2, 50));
this->addChild(pLabel3);


화면 전환 

CCScene* pScene = TestScene2::scene();
CCDirector::sharedDirector()->pushScene( createTransition(14, 1, pScene));
CCDirector::sharedDirector()->replaceScene(pScene);
// pushScene, replaceScene 두가지.. 

plist사용하기

CCSpriteFrameCache *cache = CCSpriteFrameCache::sharedSpriteFrameCache();
cache->addSpriteFramesWithFile("animations/sample.plist");

CCArray* animFrames = CCArray::createWithCapacity(15);

char str[100] = {0};
for ( int i=1 ; i< 15 ; i ++){
sprintf(str, "grossini_dance_%02d.png", i);
CCSpriteFrame* frame = cache->spriteFrameByName(str);
animFrames->addObject(frame);
}

CCSprite *pMan= CCSprite::createWithSpriteFrameName("grossini_dance_01.png");
pMan->setPosition( ccp(240, 160));
this->addChild(pMan);

CCAnimation* animation = CCAnimation::createWithSpriteFrames(animFrames, 0.5f);
CCAnimate* animate = CCAnimate::create(animation);
CCAction* rep = CCRepeatForever::create(animate);
pMan->runAction(rep); 

2014년 4월 2일 수요일

Visual Studio 단축키

Visual Studio 단축키


F12 : 함수 정의로 이동
Ctrl + *    : 이전으로 돌아가기
Ctrl + -    : 이전

Alt + F8    : 소스코드 정리

Ctrl + F2  : 북마크 설정
F2          : 북마크로 이동

Ctrl + k + c : 주석처리
Ctrl + k + u : 주석해제

Ctrl + F3     : 현재 커서 문자열 찾기
F2             :  다음 찾기

Ctrl + tab    : 현재 파일 전환


2014년 4월 1일 화요일

Inno Setup

# Free Installer for Window programs.

http://www.jrsoftware.org/isinfo.php

Key features:
  • Support for every Windows release since 2000, including: Windows 8, Windows Server 2012, Windows 7, Windows Server 2008 R2, Windows Vista, Windows Server 2008, Windows XP, Windows Server 2003, and Windows 2000. (No service packs are required.)
  • Extensive support for installation of 64-bit applications on the 64-bit editions of Windows. Both the x64 and Itanium architectures are supported. (On the Itanium architecture, Service Pack 1 or later is required on Windows Server 2003 to install in 64-bit mode.)
  • Supports creation of a single EXE to install your program for easy online distribution. Disk spanning is also supported.
  • Standard Windows 2000/XP-style wizard interface.
  • Customizable setup types, e.g. Full, Minimal, Custom.
  • Complete uninstall capabilities.
  • Installation of files:
    Includes integrated support for "deflate", bzip2, and 7-Zip LZMA/LZMA2 file compression. The installer has the ability to compare file version info, replace in-use files, use shared file counting, register DLL/OCX's and type libraries, and install fonts.
  • Creation of shortcuts anywhere, including in the Start Menu and on the desktop.
  • Creation of registry and .INI entries.
  • Running other programs before, during or after install.
  • Support for multilingual installs, including right-to-left language support.
  • Support for passworded and encrypted installs.
  • Support for digitally signed installs and uninstalls.
  • Silent install and uninstall.
  • Unicode installs.
  • Integrated preprocessor option for advanced compile-time customization.
  • Integrated Pascal scripting engine option for advanced run-time install and uninstall customization.
  • Full source code is available (Borland Delphi 2.0-5.0 and 2009).
 # Istool
  1. Web site : http://sourceforge.net/projects/istool/files/1.%20ISTool/
  2. Download : http://sourceforge.net/projects/istool/files/1.%20ISTool/release-5.3.0/istool-5.3.0.exe
# API Help :  http://www.jrsoftware.org/ishelp/


> Example

; Script generated by the Inno Setup Script Wizard.
; SEE THE DOCUMENTATION FOR DETAILS ON CREATING INNO SETUP SCRIPT FILES!

#define MyAppName "dzremote"
#define MyAppVersion "0.5"
#define MyAppPublisher "MyCompany, Inc."
#define MyAppURL "http://www.MyCompany.co.kr/"
#define MyAppExeName "dzremotec.exe"

[Setup]
; NOTE: The value of AppId uniquely identifies this application.
; Do not use the same AppId value in installers for other applications.
; (To generate a new GUID, click Tools | Generate GUID inside the IDE.)
AppId={{41009AD5-09AE-4B9B-8AF5-30E75C5DE52C}
AppName={#MyAppName}
AppVersion={#MyAppVersion}
;AppVerName={#MyAppName} {#MyAppVersion}
AppPublisher={#MyAppPublisher}
AppPublisherURL={#MyAppURL}
AppSupportURL={#MyAppURL}
AppUpdatesURL={#MyAppURL}
DefaultDirName={pf}\{#MyAppName}
DefaultGroupName={#MyAppName}
OutputDir=C:\Users\hslee\Desktop
OutputBaseFilename=dzremote_setup_v0.05
Compression=lzma
SolidCompression=yes

[Languages]
Name: english; MessagesFile: compiler:Default.isl

[Tasks]
Name: desktopicon; Description: {cm:CreateDesktopIcon}; GroupDescription: {cm:AdditionalIcons}; Flags: unchecked

[Files]
Source: ..\..\share\dzremote_v0_05\dzremotec.exe; DestDir: {app}; Flags: ignoreversion
Source: ..\..\share\dzremote_v0_05\*.dll; DestDir: {app}; Flags: ignoreversion
Source: ..\..\share\dzremote_v0_05\platforms\*; DestDir: {app}; Flags: ignoreversion recursesubdirs createallsubdirs
; NOTE: Don't use "Flags: ignoreversion" on any shared system files

[Icons]
Name: {group}\{#MyAppName}; Filename: {app}\{#MyAppExeName}
Name: {commondesktop}\{#MyAppName}; Filename: {app}\{#MyAppExeName}; Tasks: desktopicon

[Run]
Filename: {app}\{#MyAppExeName}; Description: Run dzremote.exe; Flags: nowait postinstall skipifsilent; Tasks: ; Languages:

[UninstallDelete]
Name: {app}\*; Type: filesandordirs; Tasks: ; Languages:

2014년 3월 25일 화요일

[Android] iTextPdf 사용하기.

1 ITextG

# License 관련 : AGPL 라이센스로, 라이브러리를 사용하면 코드를 공개해야 함.

2 iTextG

-  iTextG를 사용하기 위해 libs에 itextg-5.5.0.jar 를 추가한다.

3. Code 사용

public class HelloWorldDirect {
 
    /** Path to the resulting PDF file. */
    public static final String RESULT
        = "results/part1/chapter01/hello_direct.pdf";
 
    /** * Creates a PDF file: hello_direct.pdf * @param args no arguments needed */
    public static void main(String[] args)
        throws DocumentException, IOException {
        // step 1
        Document document = new Document();
        // step 2
        PdfWriter writer =
            PdfWriter.getInstance(document, new FileOutputStream(RESULT));
        // step 3
        document.open();
        // step 4
        PdfContentByte canvas = writer.getDirectContentUnder();
        writer.setCompressionLevel(0);
        canvas.saveState();                               // q
        canvas.beginText();                               // BT
        canvas.moveText(36, 788);                         // 36 788 Td
        canvas.setFontAndSize(BaseFont.createFont(), 12); // /F1 12 Tf
        canvas.showText("Hello World");                   // (Hello World)Tj
        canvas.endText();                                 // ET
        canvas.restoreState();                            // Q
        // step 5
        document.close();
    }
}
public class ImageDirect {
 
    /** The resulting PDF. */
    public static final String RESULT
        = "results/part1/chapter03/image_direct.pdf";
    /** The movie poster. */
    public static final String RESOURCE
        = "resources/img/loa.jpg";
 
    public static void main(String[] args)
        throws IOException, DocumentException {
     // step 1
        Document document
            = new Document(PageSize.POSTCARD, 30, 30, 30, 30);
        // step 2
        PdfWriter writer
            = PdfWriter.getInstance(document, new FileOutputStream(RESULT));
        writer.setCompressionLevel(0);
        // step 3
        document.open();
        // step 4
        Image img = Image.getInstance(RESOURCE);
        img.setAbsolutePosition((PageSize.POSTCARD.getWidth() - img.getScaledWidth()) / 2,
                (PageSize.POSTCARD.getHeight() - img.getScaledHeight()) / 2);
        writer.getDirectContent().addImage(img);
        Paragraph p = new Paragraph("Foobar Film Festival", new Font(FontFamily.HELVETICA, 22));
        p.setAlignment(Element.ALIGN_CENTER);
        document.add(p);
        // step 5
        document.close();
    }
}
이미지 Scale 조정
public static final String 222 = "/mnt/sdcard/222";
public static final String RESULT =2222 + "/image_direct.pdf";
Image img = Image.getInstance(RESOURCE);
img.scaleToFit(PageSize.A4.getWidth(), PageSize.A4.getHeight());

4. Sample Project


[Android] 가로 고정 앱.


# 어플리케이션을 개발하다보면 가로 고정이 필요한 경우가 생기는데..
# 본 앱으로 설정을 하게 되면 런처까지도 가로 고정이 되는 기능을 가지고 있다.
   언제든지 설정을 하면 고정을 설정 / 해제 가능


2014년 3월 4일 화요일

[Android] Decompile

> JAVA 코드는 우선 모두 코드를 볼수 있다는 점에 좀 그렇긴하지만.. 난독화를 해도
   형태를 볼 수 있다는 점.


#1. 압축을 푼다. -> APK Extract
>  7zip 같은 압축 프로그램을 이용해서, 압축을 해제한다.
#2. Classes.dex 를 푼다
> dex2class : http://code.google.com/p/dex2jar/downloads/list
> 압축을 해제하면, dex파일이 나오는데, dex를 위 프로그램을 이용해서 class로 변환
#3. class를 푼다.

> Eclipse용 디컴파일러 : http://jadclipse.sf.net/update

> 디컴파일 프로그램 :: http://varaneckas.com/jad/
  class가 있는 디렉토리에 들어가서 아래 명령어를 실행하면 test 디렉토리에 소스가 생성됨
      jad.exe -o -r -d test -s java ./*.class
      jad.exe -o -r -d test -s java **/*.class          : 하위디렉토리까지 몽땅

 #3-1. UI로 확인만 하고 싶은 경우 :  http://java.decompiler.free.fr/?q=jdgui

#4. AndroidManifest.xml 풀기
> android4me :  http://code.google.com/p/android4me/
   java -jar AXMLPrinter2.jar AndroidManifest.xml > _AndroidManifest.xml

[OSS] OSS 참여하기


> OSS에 참여하기 위한 방법


http://guruble.wordpress.com/2014/02/27/%EC%98%A4%ED%94%88%EC%86%8C%EC%8A%A4-%ED%94%84%EB%A1%9C%EC%A0%9D%ED%8A%B8%EC%9D%98-%EC%BB%A8%ED%8A%B8%EB%A6%AC%EB%B7%B0%ED%84%B0%EB%8A%94-%EC%96%B4%EB%96%BB%EA%B2%8C-%EB%90%98%EB%8A%94-%EA%B2%83/

2014년 3월 3일 월요일

[Android] TextEdit 원하는 언어의 IME 띄워주기.


TextEdit에서 원하는 IME를 출력시키려면?


인터넷을 찾아보면,
   EditText lotId_input = (EditText) findViewById(R.id.lotStatus_lotId);
   lotId_input.setPrivateImeOptions("defaultInputmode=english; ");

이런식으로 나오는데, 동작안됨.
>> IME가 지원을 하지 않기 때문.

## OpenSource 키보드를 확인해보자..
 Kandroid에서 공유된 오픈소스 키보드다.
 https://code.google.com/p/hangulkeyboard/source/checkout
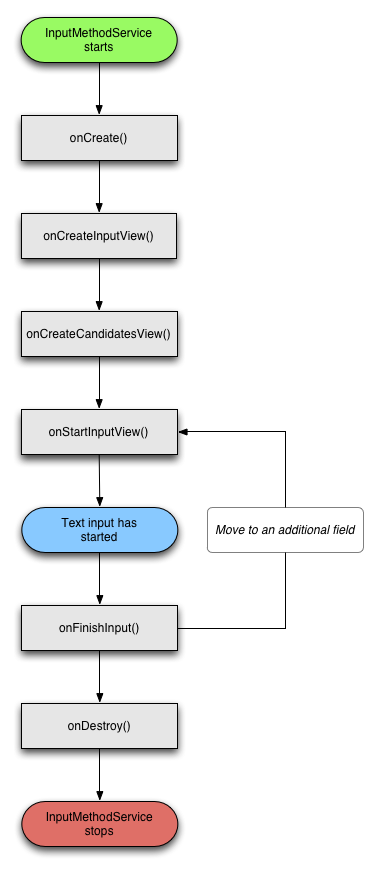
 여기를 확인해보면, onStartInput 함수에서 EditorInfo attribute 값을 주목하자.

>> 소스를 커스터마이즈 해서, 옵션이 들어가면 키보드를 변경하는 루틴을 추가하면
     될 것이라 예상 된다.

SoftKeyboard.java

    /**
     * This is the main point where we do our initialization of the input method
     * to begin operating on an application.  At this point we have been
     * bound to the client, and are now receiving all of the detailed information
     * about the target of our edits.
     */
    @Override public void onStartInput(EditorInfo attribute, boolean restarting) {
        super.onStartInput(attribute, restarting);
/*      
        Log.i("Hangul", "onStartInput");
*/
        clearHangul();
        clearSejong();
        previousCurPos = -1;      
     
        // Reset our state.  We want to do this even if restarting, because
        // the underlying state of the text editor could have changed in any way.
        mComposing.setLength(0);
        updateCandidates();
     
        if (!restarting) {
            // Clear shift states.
            mMetaState = 0;
        }
     
        mPredictionOn = false;
        mCompletionOn = false;
        mCompletions = null;
     
        // We are now going to initialize our state based on the type of
        // text being edited.
        switch (attribute.inputType&EditorInfo.TYPE_MASK_CLASS) {
            case EditorInfo.TYPE_CLASS_NUMBER:
            case EditorInfo.TYPE_CLASS_DATETIME:
                // Numbers and dates default to the symbols keyboard, with
                // no extra features.
                mCurKeyboard = mSymbolsKeyboard;
                break;
             
            case EditorInfo.TYPE_CLASS_PHONE:
                // Phones will also default to the symbols keyboard, though
                // often you will want to have a dedicated phone keyboard.
                mCurKeyboard = mSymbolsKeyboard;
                break;
             
            case EditorInfo.TYPE_CLASS_TEXT:
                // This is general text editing.  We will default to the
                // normal alphabetic keyboard, and assume that we should
                // be doing predictive text (showing candidates as the
                // user types).
                mCurKeyboard = mQwertyKeyboard;
                mPredictionOn = true;
             
                // We now look for a few special variations of text that will
                // modify our behavior.
                int variation = attribute.inputType &  EditorInfo.TYPE_MASK_VARIATION;
                if (variation == EditorInfo.TYPE_TEXT_VARIATION_PASSWORD ||
                        variation == EditorInfo.TYPE_TEXT_VARIATION_VISIBLE_PASSWORD) {
                    // Do not display predictions / what the user is typing
                    // when they are entering a password.
                    mPredictionOn = false;
                }
             
                if (variation == EditorInfo.TYPE_TEXT_VARIATION_EMAIL_ADDRESS
                        || variation == EditorInfo.TYPE_TEXT_VARIATION_URI
                        || variation == EditorInfo.TYPE_TEXT_VARIATION_FILTER) {
                    // Our predictions are not useful for e-mail addresses
                    // or URIs.
                    mPredictionOn = false;
                }
             
                if ((attribute.inputType&EditorInfo.TYPE_TEXT_FLAG_AUTO_COMPLETE) != 0) {
                    // If this is an auto-complete text view, then our predictions
                    // will not be shown and instead we will allow the editor
                    // to supply their own.  We only show the editor's
                    // candidates when in fullscreen mode, otherwise relying
                    // own it displaying its own UI.
                    mPredictionOn = false;
                    mCompletionOn = isFullscreenMode();
                }
             
                // We also want to look at the current state of the editor
                // to decide whether our alphabetic keyboard should start out
                // shifted.
                updateShiftKeyState(attribute);
                break;
             
            default:
                // For all unknown input types, default to the alphabetic
                // keyboard with no special features.
                mCurKeyboard = mQwertyKeyboard;
                updateShiftKeyState(attribute);
        }
     
        // Update the label on the enter key, depending on what the application
        // says it will do.
        mCurKeyboard.setImeOptions(getResources(), attribute.imeOptions);
     
    }


참고:
http://effectiveprogramming.tistory.com/11
http://android-developers.blogspot.kr/2009/04/creating-input-method.html


# 본 게시물의 View수가 많은 것 같아서 해결책을 덧붙여본다.
  InputMethodManager imm = (InputMethodManager)mContext.getSystemService(Context.INPUT_METHOD_SERVICE);
        String inputId = "";
        List<InputMethodInfo> inputMethodInfos = imm.getInputMethodList();
        for ( InputMethodInfo inputMethodInfo : inputMethodInfos ) {
            if ( inputMethodInfo.getId().contains(keyType)){          
                inputId = inputMethodInfo.getId();
                break;
            }
        }

INPUT_METHOD_SERVICE를 이용해서, 시스템에 설치된 키보드의 ID를 가져온다.

   imm.setInputMethod(null, inputId);

setInputMethod함수로 해당 아이디를 지정하면, 기본 IME가 변경된다.